Students Attendance Tracking App
Overview
This Attendance Tracking App is designed to help teacher easily manage student attendance in their classes. It allows teacher to create classes, organize them by year, add students, create groups, schedule sessions, mark attendance, and generate reports.
Features
-
Create a New Class: Teacher can create a new class by providing details such as name, specialty, level, and college year.
-
Create Groups: Teacher can create groups for existing classes and specify the type (TD/TP) for each group.
-
Delete Class: Teacher can delete a class if needed.
-
Delete Group: Teacher can delete a group associated with a class.
-
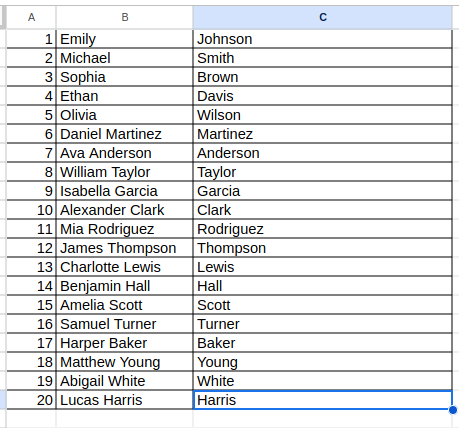
Import Students List: Teacher can load the students list as an Excel file and associate it with the created group. Excel file Example: max rows is 100

-
View Classes Organized by Year: Teacher can view classes organized by year for easy access.
-
Edit Class Information: Teacher can edit all the information of a class.
-
Add Students to Group: Teacher can add students to a group, including transferred or late registered students not included in the Excel file.
-
Transfer Students: Teacher can transfer a student from one group to another within the same class.
-
Create Session: Teacher can create a session for a group by providing the date and time.
-
Edit Session Details: Teacher can change the date and time of a session if needed.
-
Mark Attendance: Teacher can mark the attendance of students for a session by specifying their presence or absence.
-
Change Attendance State: Teacher can change the attendance state of a student if an error is made.
-
Provide Comments: Teacher can provide comments for individual students.
-
View Total Number of Students Present: Teacher can see the total number of students present in a session.
-
Change Absence State: Teacher can change the state of a student from 'absent' to 'justified absence'.
-
Export Absence State: Teacher can export the absence state of a group as an Excel file for a specified duration.
Getting Started
Installation
- Clone the repository.
- Navigate to the project directory.
- Run
npm installto install dependencies.
Usage
- Run
ionic serveto start the app in the browser. - Register or log in as a teacher.
- Follow the intuitive interface to perform various actions such as creating classes, adding students, marking attendance, etc.
Web App Link
Technologies Used
- Ionic React
- Local SQLite Database
- Supabase
Supabase Integration
Authentication
This app utilizes Supabase authentication to allow teachers to log in and commit changes to the database. Supabase provides easy-to-use authentication functionality, allowing users to sign up, log in, and manage their accounts securely.
Committing Changes
After logging in, teachers can commit changes made to the local database to the Supabase database. This ensures that data remains synchronized between the local and remote databases, providing a seamless experience for users.
Database Structure
The Supabase database structure includes a table named users_commits, which stores commit information:
create table public.users_commits (
  commit_id uuid not null default gen_random_uuid (),
  user_id uuid null default auth.uid (),
  created_at timestamp with time zone not null default now(),
  db_snapshot jsonb not null,
  constraint users_commits_pkey primary key (commit_id),
  constraint users_commits_db_snapshot_key unique (db_snapshot)
) tablespace pg_default;

create policy "Enable insert for authenticated users only" on "public"."users_commits" as permissive for insert to authenticated with check (true);

create policy "Enable select for users based on user_id" on "public"."users_commits" as permissive for select to authenticated using ((auth.uid() = user_id));
The table consists of the following columns:
commit_id: Unique identifier for each commit.user_id: User ID associated with the commit (defaults to the authenticated user).created_at: Timestamp indicating when the commit was made.db_snapshot: JSONB data representing the snapshot of the database at the time of the commit.
Installation
To integrate Supabase authentication and commit changes functionality into your app:
- Sign up for a Supabase account and create a new project.
- Follow the Supabase documentation to set up authentication for your app.
- Configure your app to authenticate users using Supabase.
For detailed instructions on integrating Supabase into your app, refer to the Supabase documentation.
Credits
This app was developed by AliAkrem7 for educational purposes.
License
MIT